Battery switch on travel trailer function is crucial for managing your RV’s power. This guide breaks down everything you need to know about these switches, from understanding their different types and how they work to troubleshooting common problems and performing essential maintenance. We’ll cover single, dual, and selector switches, showing you how to connect and disconnect batteries safely, and even offer tips for extending the life of your battery switch.
Get ready to become a power management pro!
We’ll explore the intricacies of your travel trailer’s electrical system, demonstrating how the battery switch interacts with other components like solar panels and converters. Learn about best practices for preventing corrosion, maintaining connections, and diagnosing issues. By the end, you’ll confidently manage your RV’s power, ensuring smooth and enjoyable trips.
Connecting and Disconnecting Batteries

Connecting and disconnecting your travel trailer’s house batteries to the battery switch is a straightforward process, but safety is paramount. Properly maintained connections are crucial for reliable power and preventing costly repairs. This section details the procedure, best practices, and vital safety precautions.
To connect your batteries, first ensure the battery switch is in the “OFF” position. Then, firmly attach the positive (+) cables to the positive terminals of your batteries and the negative (-) cables to the negative terminals. Make sure all connections are clean and tight. To disconnect, simply reverse the process, ensuring the switch remains OFF throughout.
Battery Connection Maintenance
Regular maintenance of your battery connections is essential to prevent corrosion and ensure reliable power. Corrosion can build up over time, hindering current flow and potentially damaging your batteries and electrical system. Inspect your connections at least every three months, and more frequently if you live in a humid climate or near saltwater. Clean any corrosion with a wire brush and baking soda paste.
Apply a dielectric grease to the terminals and connections after cleaning to prevent future corrosion. This simple maintenance will significantly extend the life of your batteries and your electrical system.
Safety Precautions for Working with Batteries
Working with batteries and electrical systems requires caution. Always wear safety glasses to protect your eyes from potential splashes of acid or sparks. Never wear loose clothing or jewelry that could get caught in moving parts or create a short circuit. Ensure the area is well-ventilated, as batteries release hydrogen gas, which is highly flammable. Avoid sparks or flames near batteries.
If working on a vehicle, disconnect the negative (-) terminal first and reconnect it last to prevent accidental shorts. If you are unsure about any aspect of the process, consult a qualified electrician.
Dual Battery Setup Wiring Diagram
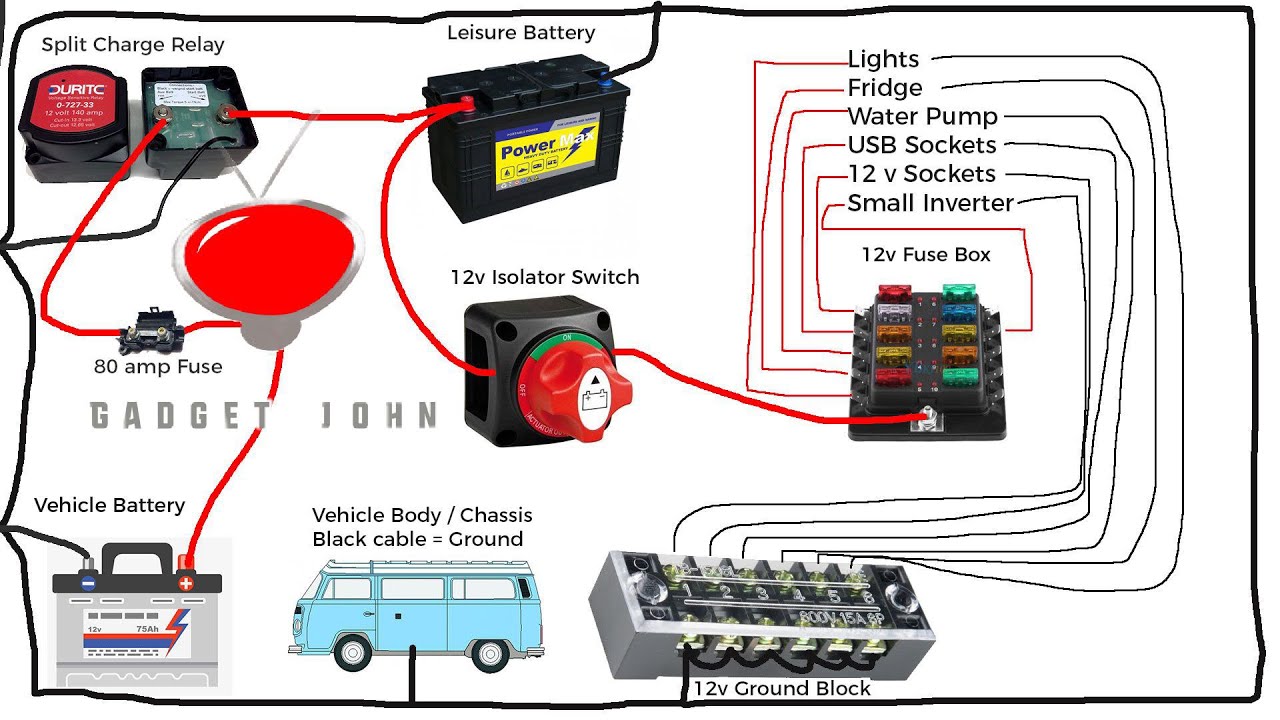
Imagine a diagram showing two 12V batteries, labeled Battery 1 and Battery 2. Each battery has a positive (+) and negative (-) terminal. From the positive terminal of each battery, a heavy-gauge wire runs to a double-pole, double-throw (DPDT) battery switch. These wires are connected to the “Battery 1” and “Battery 2” input terminals on the switch.
From the “Output” terminals of the switch, another heavy-gauge wire runs to the positive bus bar of your trailer’s electrical system. The negative (-) terminals of both batteries are connected directly to the negative bus bar of the trailer’s electrical system via separate heavy-gauge wires. This creates a parallel configuration allowing both batteries to supply power simultaneously when the switch is on.
So, you’re an audiophile who loves to travel? Awesome! First things first, you’ll want to check out this guide on creating the perfect audiophile travel setup to ensure your listening pleasure isn’t compromised on the road. And while you’re planning your amazing trip, remember to sort out your travel insurance. Getting Aon travel insurance is a smart move; peace of mind is priceless, especially when you’re carrying around expensive audio equipment!
The switch acts as a selector, allowing you to choose which battery (or both) provides power to the system. It’s crucial that all wire connections are secure and properly sized to handle the amperage draw of your system. The use of appropriately sized fuses or circuit breakers in the positive lines is also essential for safety.
Troubleshooting Common Battery Switch Issues
Your travel trailer’s battery switch is a crucial component, ensuring you have power when you need it. Problems with this switch can leave you stranded without lights, refrigeration, or other essential systems. Understanding common issues and how to troubleshoot them can save you time, frustration, and potential costly repairs.
Common Battery Switch Problems and Their Solutions
Several problems can arise with your travel trailer’s battery switch. No power to your appliances is a common symptom, often indicating a faulty switch, corroded connections, or a blown fuse. Intermittent power suggests a loose connection or a switch that’s failing intermittently. A completely dead battery, even after charging, might point to a problem with the switch preventing proper charging.
Let’s look at how to address these issues.
Diagnosing a Faulty Battery Switch
First, visually inspect the switch itself for any signs of damage, such as cracks, burns, or corrosion. Check all wiring connections for looseness, corrosion, or broken wires. A multimeter is invaluable here. Test the voltage at both ends of the switch to determine if power is getting to the switch and leaving it. If you have no voltage at the input side, trace the wiring back to the battery and check for blown fuses or broken connections.
If voltage is present at the input but not the output, the switch itself is likely faulty. If the voltage is intermittent, a loose connection or a failing switch is highly probable. Remember to always disconnect the negative battery terminal before performing any electrical tests or repairs.
So, you’re an audiophile who loves to travel? Awesome! Make sure you check out this guide on audiophile travel setup to keep your tunes sounding amazing on the go. And don’t forget the important stuff – travel insurance! Getting Aon travel insurance is a smart move before you jet off, protecting your trip and your precious gear.
Planning ahead makes for a smoother, more enjoyable adventure for any music lover.
Tools for Battery Switch Maintenance and Repair
Proper tools make troubleshooting and repair easier and safer. Having the right tools on hand will ensure a smooth and efficient process.
- Multimeter: Essential for testing voltage and continuity.
- Wire brush: Cleans corrosion from battery terminals and connections.
- Wrench set: For tightening battery terminal connections and switch mounting bolts (sizes vary depending on your setup).
- Screwdrivers (Phillips and flathead): For accessing and removing panels and connections.
- Replacement fuses (if applicable): Always carry spares that match your system’s specifications.
- Electrical tape: For securing connections and repairing damaged insulation.
- Safety glasses and gloves: Protect your eyes and hands from potential hazards.
Battery Switch and Power Management Systems
Your travel trailer’s battery switch is the central nervous system of your power setup, controlling the flow of electricity between your batteries and the rest of your electrical system. Understanding how it works with other components is key to efficient and safe power management.The battery switch acts as a gatekeeper, determining which power sources feed your trailer’s appliances and systems.
It interacts with solar panels by allowing the charging current from the panels to reach the batteries. Similarly, the converter, which transforms 12V DC power from your batteries to 120V AC power for your household appliances, relies on the battery switch to access the battery bank. When the switch is in the “off” position, all power flow is interrupted.
Power Management System Comparisons
Travel trailers utilize various power management systems, each with its strengths and weaknesses. Simple systems use a single battery switch and rely on the converter to manage charging from shore power. More sophisticated systems incorporate features like automatic charging from multiple sources (shore power, solar, generator), battery monitoring, and low-voltage protection. A basic system might lack the fine-grained control and safety features of a more advanced system.
For instance, a basic system may not prevent overcharging, whereas a more advanced system might incorporate a smart charger to prevent battery damage. A more complex system might include a digital display showing battery voltage, amperage, and state of charge. This provides more control and allows for proactive management of power consumption.
Battery Switch Usage for Power Consumption Management, Battery switch on travel trailer function
Effective use of the battery switch involves understanding your power sources and consumption patterns. Before leaving your campsite, switch to the “off” position to prevent accidental discharge. When connected to shore power, the switch allows the converter to charge the batteries while simultaneously powering your appliances. When using solar power, the switch allows the solar controller to charge the batteries.
By carefully managing the switch’s position, you can prevent battery drain and ensure you have sufficient power for your needs. For example, if you know you’ll be off-grid for a day, ensure your batteries are fully charged before turning off shore power and switching to the battery mode.
Power Flow within a Typical Travel Trailer Electrical System
The following flowchart illustrates a typical power flow within a travel trailer electrical system.
                                     +-----------------+
                                     |  Shore Power   |
                                     +--------+--------+
                                             |
                                             V
                                     +--------+--------+
                                     |  Converter     |-----> 120V AC Outlets
                                     +--------+--------+
                                             ^
                                             |
                                     +--------+--------+
                                     | Battery Switch |
                                     +--------+--------+
                                             |
                                             V
                                     +--------+--------+
                                     |   Batteries    |-----> 12V DC Appliances
                                     +--------+--------+
                                             ^
                                             |
                                     +--------+--------+
                                     | Solar Panels   |
                                     +--------+--------+
                                             |
                                     +--------+--------+
                                     | Solar Controller|
                                     +-----------------+
This flowchart depicts the interaction between shore power, the converter, the battery switch, the batteries, and solar panels.
Shore power feeds the converter, which provides 120V AC power. The battery switch controls power flow to and from the batteries. The batteries supply 12V DC power directly to appliances, and also feed the converter when shore power is unavailable. Solar panels, regulated by the solar controller, charge the batteries. The battery switch acts as a central control point, allowing the user to select the power source and manage power consumption.
Mastering your travel trailer’s battery switch is key to a worry-free RV experience. From understanding the basics of operation to troubleshooting common problems and performing routine maintenance, this guide has equipped you with the knowledge to confidently manage your power system. Remember safety first when working with batteries and electrical systems. With a little know-how, you can keep your batteries charged and your adventures rolling!
Question & Answer Hub: Battery Switch On Travel Trailer Function
What happens if my battery switch is faulty?
A faulty switch can lead to no power, intermittent power, or even damage to your batteries or other electrical components. You may experience flickering lights, non-functional appliances, or even a complete power outage.
How often should I inspect my battery switch?
Inspect your battery switch before each trip and at least every three months. Check for corrosion, loose connections, and any signs of damage.
Can I use any type of battery switch in my travel trailer?
No, the appropriate switch depends on your trailer’s electrical system and the number of batteries you have. Consult your owner’s manual or a qualified RV technician for guidance.
How do I prevent corrosion on my battery terminals?
Keep terminals clean and use a corrosion inhibitor or anti-corrosion grease on the connections. Also, ensure proper ventilation around the batteries.
